

If you’re looking to streamline your email marketing efforts, Mailchimp automation is an excellent tool to help you achieve your goals. It allows you to automatically send targeted messages to your audience based on their actions, saving you time while providing a personalized experience for your subscribers. In this comprehensive guide, we’ll walk you through everything you need to know about Mailchimp automation, from setting up basic automations to advanced strategies that will improve your marketing results.
Table of Contents
What is Mailchimp Automation?
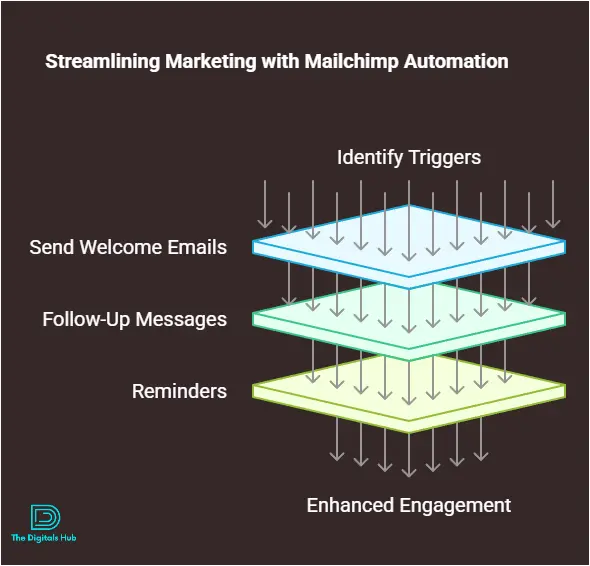
Mailchimp automation is a feature that allows you to set up automated email campaigns that trigger based on specific events or actions taken by your subscribers. These automations can help you deliver timely, relevant messages without needing to manually send emails each time. You can automate welcome emails, follow-ups, promotions, and more, based on the actions your subscribers take on your website or in response to your emails.
Mailchimp offers several types of automation, including:
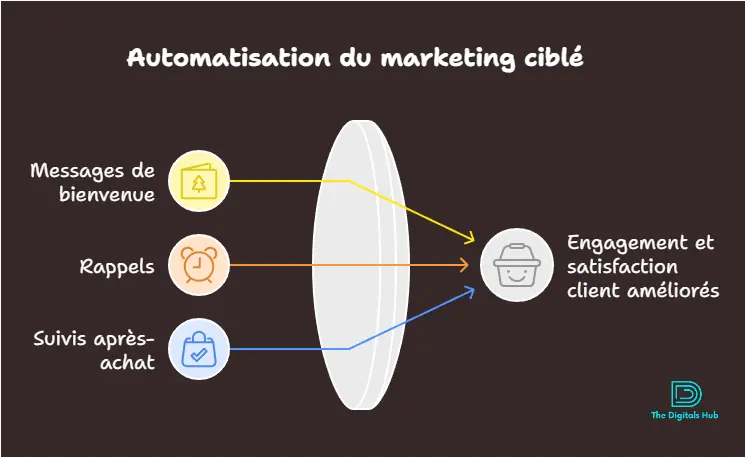
- Welcome Emails: Automatically send a message when someone subscribes to your list.
- Birthday Emails: Send personalized birthday greetings to subscribers.
- Abandoned Cart Emails: Remind customers who left items in their shopping cart to complete their purchase.
- Follow-Up Emails: Send a series of emails after someone interacts with your campaign, such as downloading an eBook or attending a webinar.
- Win-Back Emails: Re-engage inactive subscribers and encourage them to return.
Why Should You Use Mailchimp Automation?

Mailchimp automation can save you time and effort by sending personalized emails to your subscribers without requiring constant attention. Here are some key benefits:
- Save Time: Automating repetitive tasks means you don’t have to send emails manually every time.
- Personalize Your Campaigns: Deliver personalized content based on your subscriber’s actions, preferences, or interests.
- Increase Engagement: Send timely, relevant emails that increase open rates and click-through rates.
- Improve Sales: Automated emails like abandoned cart reminders and promotional offers can help you recover lost sales.
- Better Targeting: Mailchimp’s automation tools allow you to segment your audience and send targeted messages based on their behavior.
Types of Mailchimp Automations
Before diving into the setup process, let’s take a look at the different types of automations you can create in Mailchimp.
- Welcome Emails
A welcome email is often the first communication a subscriber receives from your brand, making it a critical step in building a relationship with them. Mailchimp allows you to automatically send a warm welcome message as soon as someone subscribes to your email list.
You can also use welcome emails to introduce your brand, offer a discount, or provide helpful resources to get your new subscriber started.
- Abandoned Cart Emails
If you run an e-commerce business, abandoned cart emails are essential. These emails automatically trigger when a subscriber adds an item to their shopping cart but doesn’t complete the purchase. By sending a reminder, you can recover potential lost sales and encourage customers to finish their checkout process.
- Birthday Emails
Make your subscribers feel special by sending them a birthday email. With Mailchimp, you can automatically send personalized birthday greetings and even offer special discounts to encourage a purchase.
- Follow-Up Emails
Follow-up emails are a great way to engage your audience after they’ve taken an action, like downloading a lead magnet or attending an event. These emails can guide the subscriber further down the sales funnel by providing more relevant information or offering additional products or services. - Re-engagement Emails
If you have subscribers who haven’t engaged with your emails in a while, sending a re-engagement email can help revive their interest. A re-engagement email typically includes a special offer or reminder to entice subscribers to come back and interact with your content.
How to Set Up Mailchimp Automation
Now that you understand the benefits of automation and the types of automations you can set up, let’s go over the steps to create your own automation in Mailchimp.
Step 1: Create a Mailchimp Account
If you haven’t already created a Mailchimp account, go to Mailchimp’s website and sign up for a free account. Once your account is created, you’ll be able to access all the features of Mailchimp, including automation tools.
Step 2: Define Your Goals
Before creating your automation, it’s important to know what you want to achieve. Ask yourself:
- Are you looking to welcome new subscribers?
- Do you want to remind customers about abandoned carts?
- Are you trying to re-engage inactive subscribers?
Knowing your goals will help you create more effective automations and improve your email marketing strategy.
Step 3: Set Up Your Automation Workflow
Here’s how you can set up a basic automation in Mailchimp:
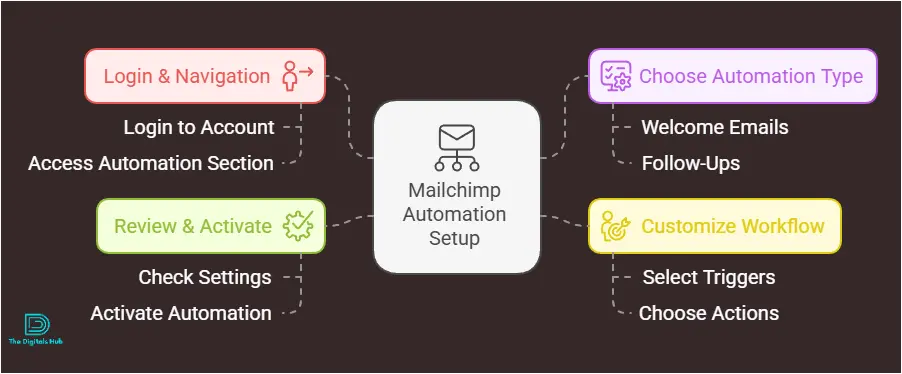
- Go to Campaigns: From your Mailchimp dashboard, click on the “Campaigns” tab.
- Create Campaign: Click the “Create Campaign” button, and select Email from the options.
- Select Automated: Choose the “Automated” option to start creating an automated email campaign.
- Choose an Automation Type: You’ll be prompted to choose an automation type. Depending on your goals, you can select from options like:
- Welcome new subscribers
- Abandoned cart
- Birthday email
- Follow-up series
- Set Triggers: A trigger is an action that starts the automation. For example, if you choose a welcome email, the trigger would be when someone subscribes to your email list.
- Design Your Email: After setting the trigger, you’ll design the email(s) that will be sent. Mailchimp offers a drag-and-drop editor to customize your email’s content, style, and layout.
- Set Timing: You can specify when the email should be sent after the trigger action occurs (e.g., send a welcome email immediately or delay it by a few hours).
- Test and Activate: Before launching your automation, it’s a good idea to send a test email to yourself to check the design and functionality. Once you’re satisfied, click Start Sending to activate the automation.
Step 4: Monitor and Optimize Your Automation
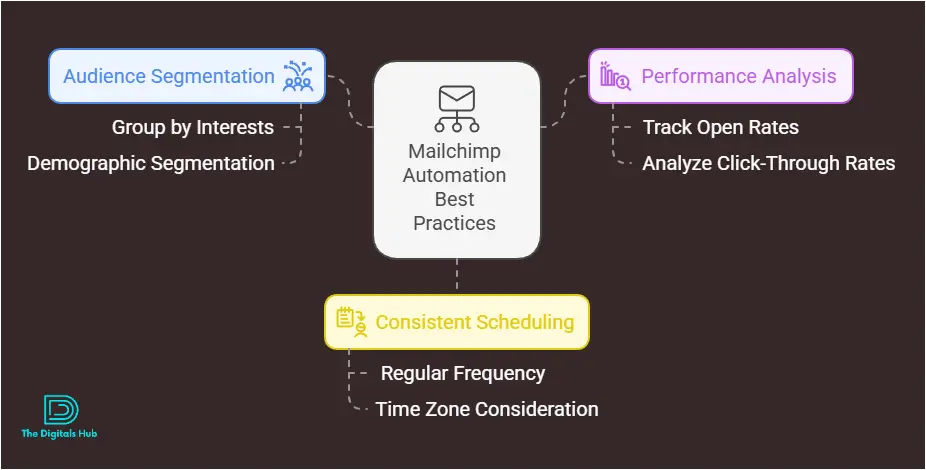
Once your automation is active, you should monitor its performance to ensure it’s achieving the desired results. Mailchimp provides detailed reports that show how your automation is performing, including metrics like:
- Open rate: How many people opened your email.
- Click-through rate (CTR): How many people clicked on the links in your email.
- Unsubscribe rate: How many people unsubscribed from your list after receiving the email.
Use this data to optimize your automations for better results. For example, if your open rate is low, you may want to test different subject lines or send times.
Best Practices for Mailchimp Automation
To get the most out of your Mailchimp automation, here are some best practices to follow:
- Segment Your Audience
Instead of sending the same email to everyone on your list, use segmentation to send more targeted messages. Segment your audience based on criteria like demographics, purchase behavior, or engagement history. - Use Personalization
Personalized emails feel more relevant to your subscribers and can improve engagement. Use merge tags in Mailchimp to personalize your emails with the recipient’s name, location, or other custom data.
- A/B Test Your Emails
Mailchimp allows you to perform A/B testing on your automated emails. Test different subject lines, content, and calls to action (CTAs) to see what works best with your audience.
- Don’t Overwhelm Subscribers
While automation is a powerful tool, sending too many automated emails in a short time can overwhelm your subscribers and lead to higher unsubscribe rates. Be mindful of how often you send automated emails and make sure they provide real value to your audience.
- Keep the Content Relevant
Each email in your automation should be relevant to the subscriber’s interests and behavior. For example, if someone abandons their shopping cart, send a reminder email with a link to their cart and perhaps a discount to encourage them to complete the purchase.
Conclusion

Mailchimp automation is a powerful way to take your email marketing to the next level. By automating tasks like welcome emails, abandoned cart reminders, and re-engagement campaigns, you can save time and create more personalized experiences for your subscribers.
Follow the steps in this guide to set up your first automation, and remember to track your results and make adjustments as needed. With Mailchimp, you can engage with your audience more effectively, improve your sales, and grow your business.
Ready to get started with Mailchimp automation? Sign up for a free Mailchimp account today and start automating your email campaigns!
This content provides a clear, step-by-step guide to using Mailchimp automation. By following these tutorials and best practices, you’ll be well on your way to running successful email marketing campaigns with less effort and greater impact.
Recent Comments