
If you’re looking to grow your business or connect with customers via email, Mailchimp is one of the best tools available. Whether you’re a beginner or have experience in email marketing, Mailchimp makes it easy to create, send, and track email campaigns. In this comprehensive guide, we’ll take you step-by-step through the process of using Mailchimp for email marketing. We’ll cover everything you need to know, from setting up an account to analyzing your email campaign results.
Table of Contents
What is Mailchimp?

Mailchimp is an email marketing platform designed to help businesses of all sizes manage and automate their email marketing efforts. It provides tools to create visually appealing emails, automate workflows, manage subscribers, and track campaign performance.
Mailchimp is known for its user-friendly interface, making it ideal for both beginners and advanced marketers. Whether you want to send regular newsletters or set up automated email series, Mailchimp is equipped with all the features you need.
Why Use Mailchimp for Email Marketing?
- Ease of Use: Mailchimp is intuitive and doesn’t require advanced technical skills to get started.
- Free Plan: You can start using Mailchimp without any cost on its free plan, which is great for small businesses or entrepreneurs just getting started.
- Automation: Mailchimp makes it easy to set up automated email sequences, saving you time and effort.
- Advanced Reporting: Mailchimp provides detailed analytics to track the success of your campaigns.
- Customizable Templates: The platform offers a range of templates, allowing you to customize emails to fit your brand’s look and feel.
Step-by-Step Guide to Using Mailchimp for Email Marketing
Now, let’s walk you through the essential steps to set up and use Mailchimp effectively for your email marketing campaigns.
Step 1: Create a Mailchimp Account
The first step is to create an account on Mailchimp. It’s free to sign up, and you can always upgrade later if you need more advanced features.
- Visit the Mailchimp website and click Sign Up.
- Enter your email address, username, and password to create your account.
- Follow the prompts to complete your profile by entering basic details about your business.
- Once done, you’ll be taken to your Mailchimp dashboard, where you can start creating your email campaigns.
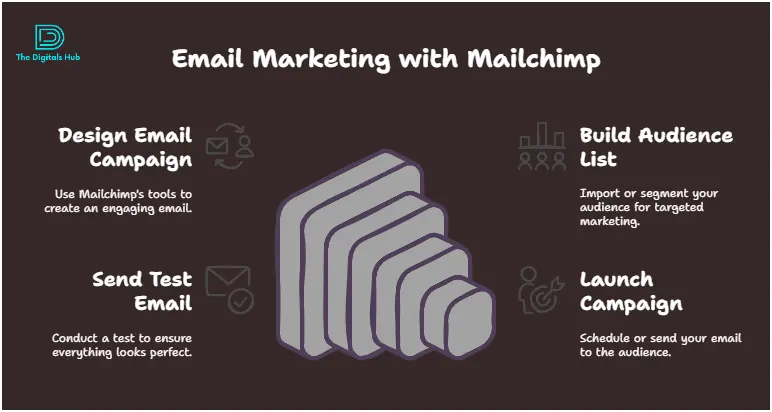
Step 2: Import or Add Your Email Subscribers
Before you can start sending emails, you need a list of subscribers to send them to. Mailchimp allows you to easily add subscribers in two ways: by importing an existing list or manually adding them one by one.
Importing Your List:

- In your Mailchimp dashboard, navigate to Audience and then Manage Audience.
- Select Import Contacts and choose the file format (CSV or Excel) or use an integrated tool like Google Sheets.
- Map the fields in your file to the corresponding Mailchimp fields (e.g., first name, last name, email).
- Review your list and click Import to add your subscribers.
Manually Adding Subscribers:
- Go to Audience and click Add Contacts.
- Select Add a Subscriber and fill in the subscriber’s details (email, name, etc.).
- Click Save to add the subscriber.
Step 3: Create Your First Email Campaign
Once you have your subscribers ready, it’s time to create your first email campaign. Mailchimp makes it easy to design emails using pre-built templates or creating your own from scratch.
- From your dashboard, click on Create Campaign.
- Select Email and then choose between:
- Regular Campaign: For a standard one-time email.
- Automated Campaign: For setting up an email sequence triggered by a specific action (e.g., welcome email for new subscribers).
- After choosing the type of campaign, you’ll be prompted to select the audience you want to send the email to. You can choose from your existing lists or create a segment of subscribers.
- Write the Subject Line, Preview Text, and choose a From Name and From Email Address that match your branding.
- Click Begin to move on to the design stage.
Step 4: Design Your Email Campaign
Mailchimp provides a wide range of email templates that you can customize to fit your brand’s style. You can choose a layout, add images, customize text, and more.
- Select a Template: Mailchimp offers multiple pre-designed templates. Choose one that aligns with the purpose of your email (newsletter, promotional, etc.).
- Customize Content: You can drag and drop elements (images, text, buttons) into your email. The editor allows you to change fonts, colors, and layouts to match your brand.
- Add Personalization: Mailchimp lets you personalize your emails with merge tags like the recipient’s name, location, or other custom data you’ve collected.
- Preview Your Email: Mailchimp gives you the option to preview your email on both desktop and mobile to ensure it looks good on all devices.
- Once you’re happy with the design, click Next to proceed.
Step 5: Set Up Automation (Optional)
If you want to automate your emails (e.g., sending a welcome email to new subscribers), Mailchimp allows you to set up email automation. Here’s how:
- From your dashboard, click Create Campaign and choose Automated Campaign.
- Choose the type of automation you want to set up (e.g., Welcome New Subscribers, Abandoned Cart, etc.).
- Set triggers that will activate the automation (e.g., a user signs up for your newsletter).
- Design your email, just like you would with a regular campaign.
- Set the timing and frequency for your automated emails, such as sending the welcome email immediately after sign-up or after a few days.
- Click Start Sending to activate the automation.
Step 6: Test Your Email
Before sending your email to your entire list, it’s important to test it first. Mailchimp allows you to send test emails so you can review the content and formatting.
- Click Send a Test Email.
- Enter your email address to receive a copy of the email.
- Review the email on both desktop and mobile devices to make sure everything looks good.
Step 7: Send Your Email Campaign
Once you’re satisfied with your email, it’s time to send it!
- When you’re ready to send, click Send.
- If you’re scheduling it, select Schedule and choose the date and time you want the email to go out.
Step 8: Monitor Your Campaign Performance
After your email is sent, it’s essential to track its performance. Mailchimp provides detailed analytics to help you understand how well your campaign is performing.
Key metrics to track include:
- Open Rate: The percentage of recipients who opened your email.
- Click-Through Rate (CTR): The percentage of recipients who clicked on links within your email.
- Bounce Rate: The percentage of emails that couldn’t be delivered.
- Unsubscribe Rate: The percentage of recipients who unsubscribed after receiving your email.
You can use these insights to improve future campaigns and better understand your audience’s preferences.
Best Practices for Email Marketing with Mailchimp
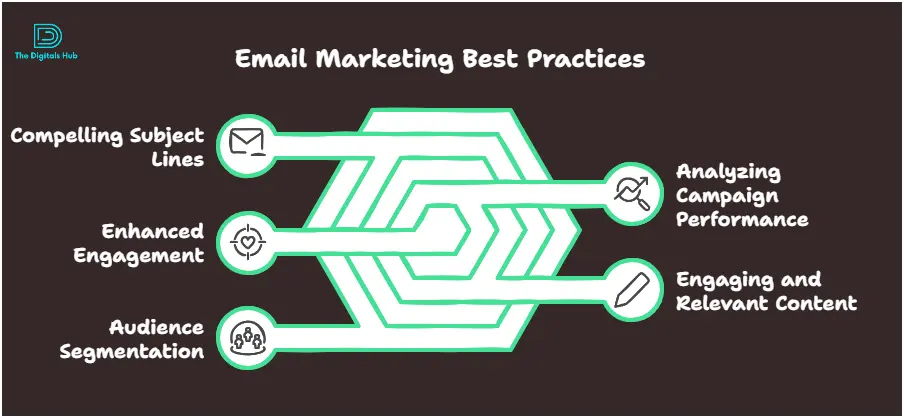
Here are some best practices to help you succeed in email marketing:
- Segment Your Audience: Divide your subscribers into smaller groups based on their behavior or interests. This allows you to send more targeted and relevant emails.
- Use A/B Testing: Mailchimp allows you to test different subject lines, content, and designs to see what resonates best with your audience.
- Personalize Your Emails: Use dynamic content and merge tags to make your emails feel more personal.
- Send Mobile-Friendly Emails: Ensure your emails look good on mobile devices, as most people check their emails on smartphones.
- Focus on Engaging Content: Write compelling subject lines and content that grabs your reader’s attention.
Conclusion
Using Mailchimp for email marketing is an excellent choice for businesses of all sizes. Its intuitive platform, powerful features, and flexible pricing make it a valuable tool for creating successful email campaigns. Whether you are sending your first email or have been marketing for years, Mailchimp can help you reach your audience effectively.
By following this step-by-step guide, you can easily create and send high-quality email campaigns, track performance, and optimize future campaigns.
Ready to start email marketing with Mailchimp? Sign up now and create your first campaign!
This content was designed to be clear and easy to understand, so you can confidently use Mailchimp for your email marketing efforts. By using the features and tips provided, you’ll be well on your way to building stronger relationships with your audience.
Recent Comments